Enjoy flat rate shipping for only $10 and free shipping on orders over $150* when you print your custom photo calendar with Posterjack. Get started today!

A photo calendar is not just a practical tool to keep track of dates; it's also a wonderful way to showcase your favourite memories throughout the year. Whether you want to create a personalized gift for a loved one or add a personal touch to your own space, making a photo calendar is a creative and enjoyable project.
In this step-by-step guide, we'll walk you through the process of creating your very own custom photo calendar with Posterjack. We'll also provide you with a list of the materials and steps to make a custom photo calendar from home using your own printer.
How to Make a Custom Photo Calendar with Posterjack
If you choose to make a custom photo calendar with Posterjack, all you need are your photos and we’ll take care of the rest!
Whether you’d like to display a collection of random photos or stick to a theme, there are endless ways you can personalize your calendar and there is no wrong way to do it. Some popular ideas we see a lot include:
- Travel
- Kids
- Animals
- Nature
- Family
If you love the idea of using random photos that aren’t connected to each other in any way but still want them to all come together cohesively, we have several themes you can choose from so the style and design of the calendar will flow nicely from month to month.
Okay, so let’s look at the step-by-step process of making a custom photo calendar using the Posterjack calendar builder.
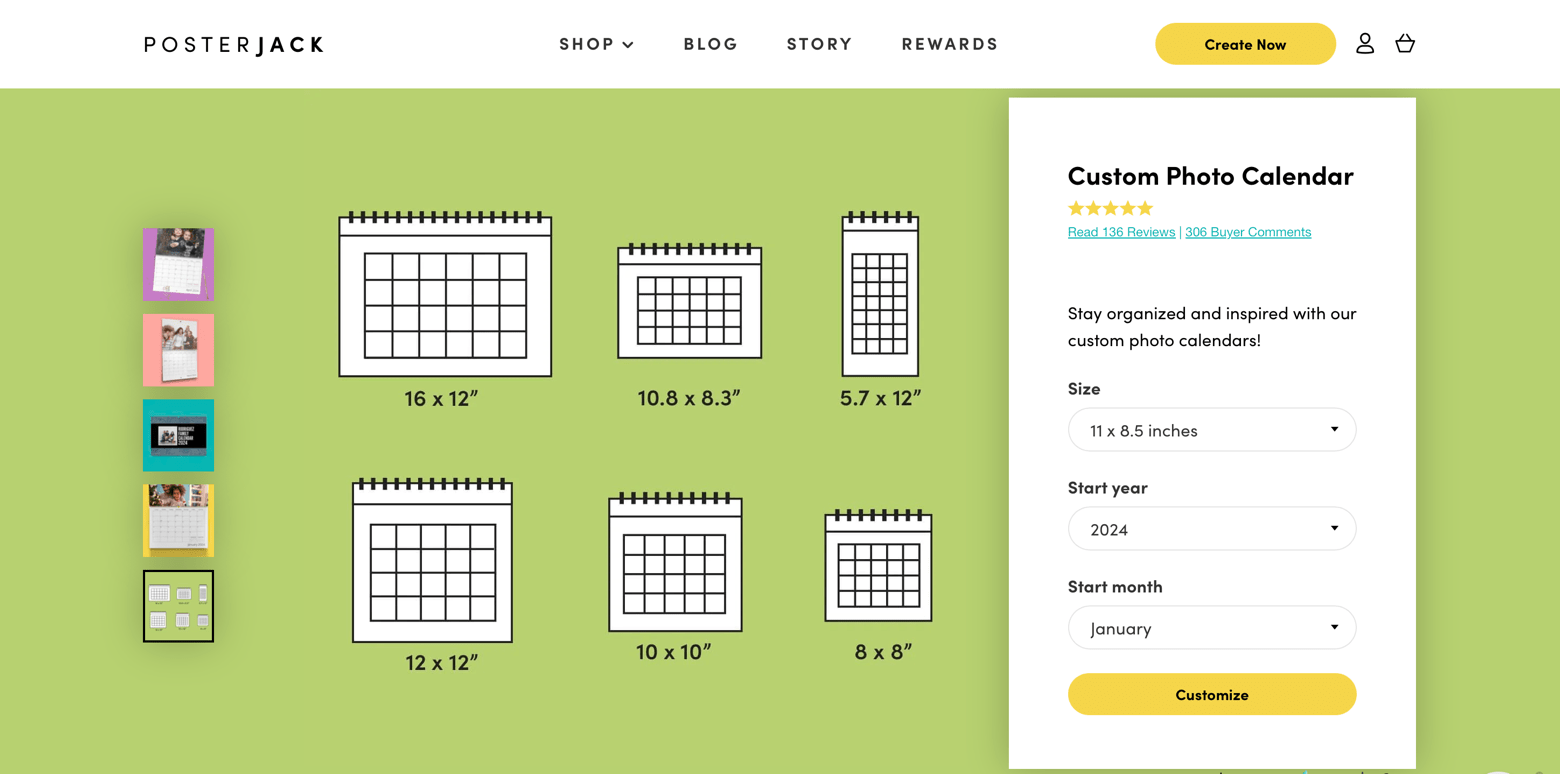
Step 1: Choose Your Calendar Size, Start Year, and Start Month

Posterjack Custom Photo Calendars come in six different sizes and you can choose the start year and start month of your calendar.
Having the option to choose a start month means you can gift a photo calendar at any point during the year, not just for Christmas.
Step 2: Select a Calendar Theme

We offer over 30 customizable calendar themes you can choose from! Scroll through the options to find one you like and then click on Select to open the builder tool.
Step 3: Customize Your Photo Calendar

Here’s where things get fun!
Our calendar builder tool is very easy to use. Simply upload your photos and drag and drop them right into the calendar template.
All of the customization options are shown on the left of the screen. They include:
Events: Edit/delete/add new events. Personalize your photo calendar to have special dates, events, and holidays and edit/remove any that aren’t relevant to you. You can even add photos to any of the days of the month to further customize your calendar.
Photos: Upload photos for your calendar or use photos you’ve uploaded to our website for past projects. For total simplicity, once you’ve selected the photos you want to use, you can select the Autofill option to have the photos automatically inserted into the pages of the calendar.
Text: Add/edit text boxes. Fonts and sizes are fully customizable.
Layout: The number of photos for each calendar month can be customized in a variety of collage layouts. Simply choose how many photos you’d like and then select the layout template.
Background: This is where you can edit your calendar’s colours and patterns if you want to customize your photo calendar beyond the themes provided.
Border: If you like your photos to have a framed look, you can add borders to any or all of your photos. Our calendar builder offers a large variety of border styles.
Filter: Seven basic photo filters are available to add to your photos if you wish.
Step 4: Preview Your Custom Photo Calendar

At the bottom of the screen, you can click on where it says Overview to select any of the month’s you’d like to take a closer look at.
At the top of the page, you can click on Preview for an overview of what your calendar will look like. If you’d like to make changes to any of the pages you’re previewing, simply click on it to open it for further editing.
Take a moment to carefully go over each page, ensuring you have the photos and events exactly as you’d like them. Double-check for typos and spelling errors and once you have everything the way you want, you can click on Add to Cart and we’ll get started on making your custom photo calendar!
How to Make a Custom Photo Calendar Using Your Own Printer
If you are interested in making a photo calendar completely from scratch on your own, here’s how to do it:
Materials You'll Need

Photos: Gather 12 of your favourite photos, one for each month of the year. You’ll need additional photos if you’d like to further customize your calendar by adding photos to specific days of the year.
Calendar Template: You can find free calendar templates online, or you can design your own using software like Microsoft Word or Adobe InDesign.
Printer: You'll need a colour printer to print your calendar pages.
Quality Paper: Choose a high-quality, thick paper for printing. Paper can be matte or glossy.
Scissors or Paper Cutter: To trim your printed pages to the correct size.
Glue or Double-sided Tape: To attach the photos to your calendar pages.
Decorative Supplies (optional): Stickers, markers, coloured paper, and other embellishments to enhance your calendar's appearance.
Binding Machine or Hole Punch and Rings/Ribbon: To hold the pages together.
Step 1: Choose Your Photos
Select 12 photos that represent the months of the year or hold special meaning to you. Make sure the resolution and quality of the photos are high for the best results in your calendar.
Step 2: Create Your Calendar Template
You can either design your own calendar template or find one online that suits your preferences. If you choose to design one yourself, you can use software like Microsoft Word or Adobe InDesign. Make sure to include space for the month's name, dates, and a section where you'll attach your photos.
Step 3: Layout Design
Now, it's time to arrange your photos on the calendar pages. Use your chosen software to insert the photos into their respective months. You can get creative with the layout, positioning the photos differently on each page.
Step 4: Print Your Calendar Pages
Once you're satisfied with the layout, print your calendar pages on the high-quality paper. Make sure your printer settings are adjusted for the best print quality.
Step 5: Trim the Pages
Carefully cut or trim the printed pages to the correct size according to your calendar template.
Step 6: Attach the Photos
Using glue or double-sided tape, adhere your chosen photos to each month's page. Ensure they are securely attached and centered.
Step 7: Add Personal Touches (Optional)
Get creative! You can use stickers, markers, or coloured paper to embellish your calendar. Add captions, quotes, or any personal touches that make your calendar unique.
Caution: If you do choose to embellish with markers, be careful to check that the inks don’t bleed through the pages.
Step 8: Assemble Your Calendar
Arrange the pages in order and stack them together. You may choose to bind them using a binding machine or punch holes and use a ring or ribbon to hold the pages together.

The Best Way to Make a Custom Photo Calendar
Creating a photo calendar is a fun and rewarding DIY project that allows you to cherish your favourite moments throughout the year and they’re also a thoughtful gift idea!
You can gather the supplies you need to make a photo calendar from home using your own printer or you can choose Posterjack to help you create a custom photo calendar.
The benefits to choosing Posterjack for your custom photo calendars include:
Quality: Posterjack Custom Photo Calendars are made using thick and sturdy coated paper stock and printed using HP Indigo inks, resulting in a calendar that looks and feels incredible. Furthermore, the calendar builder will analyze your photos to ensure the resolution is good enough to print, so you’ll be confident knowing your photos will look sharp and accurate.
Simplicity: Making a custom photo calendar using our calendar builder couldn’t be easier and is much quicker than making one from scratch. You’re provided with instructions and tips along the way and, of course, if you ever have any questions or need help, we are always happy to assist.
Customization: Our photo calendars are fully customizable, making it simple to create exactly what you’re imagining. You can choose from the several templates we offer to get started and personalize every element from colours and patterns, to text fonts and graphics, and even the number of photos on each page. It’s also easy to highlight special days by adding photos and text to important dates. If you love the idea of embellishing a calendar with your own craft supplies, there’s no reason you couldn’t do that too when you receive your calendar!
More Affordable: Compared to the cost of all the supplies you will need to make a photo calendar from scratch—everything from the thick cardstock paper, photo paper, printer ink, binding materials, adhesives, and any embellishments you want to add—Posterjack Custom Photo Calendars can be much more cost-effective, not to mention the time you will save, especially if you plan to make multiple custom photo calendars to give as gifts.

Custom photo calendars can help you stay organized and bring a smile to your face every time you look at it. It’s also a fun, thoughtful gift idea that the recipient can enjoy all year long. Get started making your custom photo calendar now!


